
Baitcasting is how you describe the process of fishing with a baitcasting reel attached to your fishing rod.
A baitcasting rod has larger rings located on the top to hold the reel in place. We do not advise using a spin casting reel on a baitcasting rod.

This reel is located on the top of the fishing rod, allowing the line to run parallel to the length of the fishing rod.
This differs from spin casting reels as they run a line perpendicular to the rod.
They work by using a free-spinning spool. This feeds your line directly down the rod and allows you to cast further using less line.
How does a baitcasting reel work?
As the line is cast, the spool moves simultaneously. Your thumb is used to help control the spool’s motion as the line is cast.
You will need to hold the rod with your dominant hand as you are casting your line. When reeling the line back in, you will need to switch hands. This will allow you to control the reel with your dominant hand.
It is harder to control and so is only advised for more experienced anglers. This is known colloquially as a bird’s nest, or more formally as backlash.
What are the parts of a baitcasting reel?
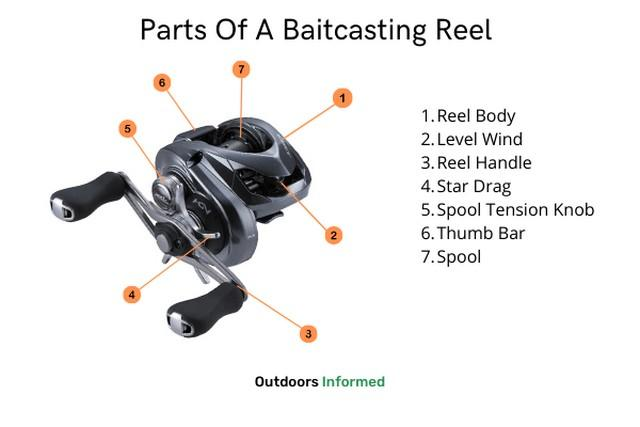
Level wind
This is often covered with a metal or plastic cover to stop the line from breaking as it travels through the spool.
It is used to guide the line onto the spool efficiently and evenly. As shown above, it is commonly located at the front of the reel.
Drag system
Also referred to as the star drag, this is a handle located just behind the handle of the reel. During fights, this is easy to locate and use.
The drag system is inbuilt to the gearing of the reel. This helps to keep the baitcasting reel design very compact and comfortable to handle.
As all anglers will tell you, drag settings are a matter of personal preference. Some people like to have it loose and prevent the line from slipping with their thumbs.
Others may prefer a tight drag setting as this allows them to focus on setting hooks.
Spool tension knob
This serves as the main braking system for your reel. It is found on the same side as the reel handle.
It is designed to allow different lure weights to be used by adjusting the required resistance. These help to prevent backlashes.
The tighter the knob is set, the fewer rotations the spool goes through. It is used as the last stage of adjustment to set up for casting lures.
Thumb bar
This is for use when you are about to cast your line.
Once you have cast it, you can turn the handle and disengage the thumb bar. This allows you to retrieve your line.
Centrifugal or variable braking system
This is the secondary braking system that works in conjunction with the spool tension knob.
It is often found on the opposite side to the spool tension knob and is located underneath a side plate.
This system has a set of small white or orange blocks that can be pressed in or out.
Pressing them out will let you hear a click which indicates that they have been activated. Once you see this, you will notice that the blocks can still move out a little.
During casting, as the spool spins, the brake blocks will push outwards to add resistance to the inside of the brake drum.
The brake drum is found on the interior of the reel’s removable side plate.
This will slow the rotation of the spool. The more blocks that you press out, the greater the resistance and the shorter time the spool will spin for.
When pressing out the brake blocks, you should ensure you push out opposite ones at the same time. This prevents the spool from developing imbalances.
Magnetic braking systems
The closer the magnetic elements are to the spool of the reel, the faster the rotations will slow - meaning the brakes are more effective.
In an aluminum spool, the metal body serves as a conductor. As the spool moves through the opposing forces of the magnetic field, a current is generated.
This opposes the force from the magnets in the brakes and forces the spool’s rotation speed to decrease.
These are often found with dials ranging from 1 to 10. Higher numbers indicate closer proximity to the spool.
The only issue with these braking systems is that you cannot turn them off. This means that there is always a level of resistance placed upon the spool.
They are better suited to being located at the back of the cast. This is because the spool spins more slowly here and so the braking mechanism is more effective.
What lines should you use?
The easiest line to use when learning how to operate a baitcasting reel is a 12 or 15-pound monofilament line.
It is the cheapest of the line type and has some stretch to it. It can be used with almost all types of knots and will hold them in place well.
A downside to monofilament is that it has line memory. This means that if it is left wrapped around a spool for a long time it retains this shape, which can impede your casting.
Fluorocarbon line is commonly used as a leader for a monofilament or braid line.
This is done as you cannot see fluorocarbon well when it is submerged in water. It has a similar refractive index to water and is nearly invisible.
It has less line memory than a monofilament line and also less stretch. It is dense and so is commonly used when you need to cast a lure deep into the water.
Braid line is one of the oldest line types. It is constructed from many strands of high molecular weight polyethylene that are braided together to create a very strong line. There is not much stretch to this line and as such, it is very sensitive.
These lines will start fraying due to wear and tear, which will make it weaken. This increases the chance of your line snapping. It is also very visible underwater.
What are the benefits of using a baitcasting reel?
Baitcasting reels are a type of low profile reel. These reels have a palm and a handle side, designed ergonomically for ease of use.
The baitcasting reel gives you a lot more control over the casting than spin casting reels do. This allows you to cast more accurately in terms of distance and location.
You can also slow the lure with a baitcasting reel. This is useful as it will drop more gently into the water, meaning that the fish will not get as scared. This means there is a greater chance of you luring a fish onto your line.
The reels are very lightweight, but capable of holding a longer and heavier line. This makes it perfect for working with heavier lures. This in turn helps with catching larger and heavier fish.
What are the downsides of using a baitcasting reel?
Baitcasting reels tend to be more expensive than standard spin casting reels. They also require more skill to use, needing a decent experience level to master.
These kinds of reels are very prone to backlashes. This is when the line in the spool rapidly bunches together.
Avoiding this is difficult, which is why you need to be a more experienced angler to use them correctly.
It is also difficult to switch between left and right orientations when using a baitcasting reel.
When should you use a baitcasting reel?
You should use a baitcasting reel once you have developed a decent level of angling skill. It is not a suitable piece of equipment for beginners to use.
It is also more expensive than a spin casting reel and beginners are not likely to wish to spend this much money on a fishing reel.
If you are attempting to reel in heavier fish, you need a strong line to do so. This is when baitcasting reels come in handy.
If the weather conditions are poor then there will be more resistance from the air on your line. The increased control a baitcasting reel offers you will help greatly in this scenario.
If you know you will be casting a lot, it is wise to use a baitcasting reel. They are lightweight and will ensure you do not get overly tired while fishing.
This lightweight reel also comes in handy if you are not using a rod holder. It will reduce the weight of your reel, therefore making your arms less tired over time.
How do you cast a baitcasting reel?
You should first take off the side plate on your reel. Ensure that at least 4 of the brake blocks inside the reel are on. This reduces the chance of backlashes and overruns developing.
Find your desired lure, and tie it to the end of your fishing rod. It should be hanging down on the line at a distance of at least 12 inches from the tip of your fishing rod.
You should next tighten the tension knob on your baitcasting reel. Turn until it no longer moves.
Release the thumb bar on the reel. If you have set up the tension correctly, the lure should not move.
Gently begin loosening the spool tension knob until the lure begins to fall onto the ground. When the lure reaches the floor the spool should stop spinning.
If it does not, you should adjust the spool tension knob until it reaches the ground.
Once you have adjusted the reel you can begin to cast.
Disengage the thumb bar and hold the spool at the same time. Cast as you usually would, but keep your thumb over the rotating spool.
Your casting distance will be reduced, to begin with. It is important to not increase this distance until you have refined your technique and you are comfortable with handling the reel.
You can then start adjusting the braking system and spool tension knob. This will help to increase your casting distance.
How do you spool a baitcasting reel?
Your first stage in spooling a baitcasting reel is to cover the center with a few yards of monofilament backing or electrical tape. This is used to prevent the braid from slipping as it moves onto the spool.
If you tie the braid onto the spool itself then it can slip as there is nothing to bind the braid to the spool. This can cause issues with the drag of your line.
As you are winding the line onto the reel, you should ensure that it is kept under tension. Try to keep the line in the center of the reel. This is to avoid the line bunching up and laying unevenly across the width of the spool.
If you notice your line beginning to bunch at one side there is a quick fix. Keep holding the line under tension and tilt your hand to the side of the spool with fewer lines. This will allow you to compensate for your mistakes and will result in a more even spool at the end.
The more confident you are in your casting abilities, the less likely you are to keep the brakes on during casting. You can use your thumb to control the speed and directionality of the line when you are more confident.
You should see a tapered edge on one side of your spool. This is used as a guide to prevent overfilling of the spool with your line. If you cannot see this tapered edge, we suggest filling the spool to just under ⅛ inch below the spool edge.
If you overfill the spool there will not be enough space between the line and the reel seat. This will mean that they bump into each other and can cause issues with your angling.
- 10 Best Trolling Motor Batteries: Top AGM and Flooded Options - January 27, 2021
- Types of Fishing Lures - January 22, 2021
- 8 Best Batteries For Fish Finders - January 22, 2021